Documentation
Send every prospect a page made for them
Sendpage connects Claude or ChatGPT to a publishing service. You paste a prospect’s details, the AI researches them and writes a personalised page, and Sendpage hosts it on a private link that tells you when it’s opened.
- 01Prospect engagesreplies, books, visits, comments
- 02Paste their detailsinto your Claude or ChatGPT project
- 03Review, then publisha link comes back in the chat
- 04Send and tracksee opens, reading time, clicks
What you can make
Anything that works as a single web page about one company: an audit of their outbound, a teardown of their website, a case study rewritten for their industry, an ROI breakdown, a hiring plan, a competitor comparison, a pre-meeting brief. You decide the format once in your prompt, and every page follows it.
Before you start · 2 minutes
What you need
| Item | Details |
|---|---|
| Your connector URL | Sent to you privately by The GTM Company. It looks like https://sendpage.co/api/mcp/…. Treat it like a password: anyone who has it can publish pages under your company name. |
| Claude or ChatGPT | Claude Pro, Max, Team or Enterprise. ChatGPT Plus, Pro, Business or Enterprise (custom connectors need developer mode). Free plans can’t add custom connectors. |
| A booking link | Calendly, Cal.com, HubSpot or similar. Every page ends with a button to it. |
| Your offer in two sentences | What you sell, who to, and what the free page gives them. You’ll put this in the prompt. |
Only one person needs to set this up to try it. Each teammate who sends pages does steps 2 or 3 in their own account, using the same connector URL and prompt.
Step 1 · 30 to 45 minutes, once
Create your prompt
The prompt is a set of instructions that sits in your Claude or ChatGPT project. It tells the AI who you are, how your pages look, what to research, and the rules it must follow. You write it once, and every prospect you paste in gets a page built the same way. The Sendpage connector only publishes the page; the prompt decides how good it is.
The three layers
| Layer | What it controls | Without it |
|---|---|---|
| Copy | Who you are, your method in your own words, your proof, your voice. | The page sounds like any AI wrote it, and your method goes unnamed. |
| Design | Exact colours, fonts, type sizes and how your logo appears. | Every page gets a different look that doesn’t match your website. |
| Layout | What the AI researches, and which sections the page has, in which order. | Pages vary in depth and shape, so you can’t review them quickly. |
Fill in each part
Copy the prompt at the bottom of this step into a text editor. Replace every [[double bracket]] field. The prompt runs top to bottom in this order:
| Part | Write | Example |
|---|---|---|
| Role | Your company, and the name of the page you give away. | a personalised Routing Cost Estimate |
| About us | Who you are, your positioning line, what makes you different, your method with its step names, outcomes you can stand behind, proof you’re allowed to use, your voice. | Method: Map → Optimise → Prove |
| Brand system | Colour codes with a rule for each, your Google Font and type sizes, a text version of your logo. | --brand-primary: #0B3D2E; /* buttons, key numbers */ |
| Step 1: Research | Add one signal that matters for your offer. | How they plan routes today, from job ads or their site |
| Step 2: Specific research | The extra research your lead magnet needs, and the rule that it must be real. | Choose 3 real upcoming trade shows that fit what they sell |
| Step 3: Core content | The main deliverable, mapped to your method, and the benchmark any projected number is based on. | A before, during and after plan for the best-fit show |
| Step 4: The page | Your sections in order. Keep the hero, key number, proof and call to action; name the middle sections. | 3. HOW WE’D DO IT: our method in three numbered steps |
| Style and guardrails | Your voice rules. Leave the fact rules as they are. | No hype, no fake urgency, no exclamation marks |
Step 5 (build, review, publish) connects the prompt to Sendpage. Leave it exactly as it is.
Getting your brand system right
- Colours: ask your designer for the hex codes, or right-click your website in Chrome, choose Inspect, and copy the colours used on buttons, headings and backgrounds.
- Fonts: if your site uses a paid font, name the closest free Google Font and say so. The page must still look right if the font fails to load.
- Say how each colour is used, not only what it is. “Purple for eyebrows and one highlighted word only” stops the AI painting whole sections in your accent colour.
- Describe your logo in words. Pages can’t embed your logo file, so write how it should appear as text, for example your name in heavy type with the tagline in small grey capitals.
Write a lead magnet that works
Too vague
“A free audit”
The AI has to guess what to audit, so every page comes out generic.
Specific
“A review of their outbound: who they target, what their site promises, and three changes to their first email”
Names the sections, so every page has the same shape and depth.
Before you save it
- No brackets left. Search the prompt for
[[. Any field you leave in, the AI will guess. - Add proof. Paste one or two real results with client permission and tell the AI when to use them.
- Keep the rules. The rules at the bottom stop the AI inventing facts about your prospect. Don’t remove them.
# ROLE
You are a senior strategist and brand designer for [[COMPANY NAME]] ([[website]]). For each prospect I give you, you produce one polished, on-brand web page: a personalised [[NAME OF THE LEAD MAGNET, e.g. "Trade Show Game Plan", "Outbound Teardown", "Routing Cost Estimate"]] built for that one company. The page is a gift, pure value with no hard sell, designed to make a senior buyer think "these people already understand my business." When it is approved, you publish it with the Sendpage tool.

# ABOUT US (brand brief, keep the page true to this)
- Who we are: [[one or two sentences: what you do, for whom, how long, any certifications]]
- Positioning line: "[[your tagline or positioning statement]]"
- What makes us different: [[your USP in plain words]]
- Our method, in our own words (use these names on the page): **[[Step 1]] → [[Step 2]] → [[Step 3]]**
  - [[Step 1]]: [[what happens]]
  - [[Step 2]]: [[what happens]]
  - [[Step 3]]: [[what happens]]
- Outcomes we create: [[2 to 4 results you can stand behind, with any benchmark you are allowed to quote]]
- Proof: [[awards, named clients you have permission to mention, case study link]]
- Voice: [[3 to 5 words, e.g. "confident, warm, precise, senior"]]. [[Anything to avoid, e.g. "no hype, no exclamation marks"]]
- Call to action: [[what the page invites them to do]] at [[booking link]]

# BRAND SYSTEM (locked, do not fetch or improvise)

## Colour
```css
:root{
  --brand-primary:   [[#hex]]; /* main accent: buttons, rules, icons, key numbers */
  --brand-primary-2: [[#hex]]; /* lighter primary, for accents on dark backgrounds */
  --brand-secondary: [[#hex]]; /* second accent, used sparingly: eyebrows, one highlighted word */
  --brand-ink:       [[#hex]]; /* headings and dark section backgrounds */
  --brand-body:      [[#hex]]; /* body text on light backgrounds */
  --brand-line:      [[#hex]]; /* thin rules and card borders */
  --brand-surface:   [[#hex]]; /* alternate light section background */
  --brand-white:     #FFFFFF;
}
```
Usage rules:
- [[How the colours are used, e.g. "Primary is the workhorse. Secondary is a spice: eyebrows and one or two words only."]]
- Alternate light sections with one or two full-width dark sections (`--brand-ink`) for the key number and the call to action.
- [[Any limits, e.g. "No gradients. Shadows no heavier than 0 2px 24px rgba(0,0,0,0.14)."]]

## Type
- Font stack: `'[[Google Font name]]', [[fallbacks]], Arial, sans-serif`. Load it from Google Fonts. The page must still look right if the font fails to load.
- H1: [[size / line-height / weight / letter-spacing]] (mobile [[size]])
- H2: [[size / line-height / weight / letter-spacing]] (mobile [[size]])
- Eyebrow above each headline: [[e.g. "uppercase, 16px, weight 600, letter-spacing 2px, secondary colour"]]
- Body: [[e.g. "18px / line-height 1.7 / weight 400, body colour"]]
- Buttons: [[e.g. "weight 700, 18px, padding 14px 32px, primary background, 4px radius"]]
- Signature look: [[the one typographic move that makes your site recognisable]]

## Logo
Do not embed image files. Render the logo as type: [[e.g. "COMPANY in 800 weight ink, then 'Tagline' in small uppercase grey"]], top left, with a thin line under the header.

## Accessibility
Body text must reach 4.5:1 contrast. Never put white text on a light accent colour; use dark text instead. Generous whitespace: [[e.g. "96 to 120px"]] section padding on desktop, [[e.g. "56 to 64px"]] on mobile.

# INPUT
I will paste the prospect: company name or website, and whatever else I have (contact name and title, their reply or comment, my notes).

# STEP 1: RESEARCH THE PROSPECT
From their website and public sources, work out:
- What they sell and who buys it.
- Where they are based and roughly how big they are.
- How they go to market today.
- [[Any signal specific to your offer, e.g. "evidence they already exhibit at events", "which tools they use", "open roles in sales"]]
List the facts you will use, each with its source. If something important is missing, ask me one short question instead of guessing.

# STEP 2: [[THE SPECIFIC RESEARCH YOUR LEAD MAGNET NEEDS]]
[[Describe it. e.g. "Choose 3 real, upcoming trade shows that fit what they sell. Capture name, dates, city, scale, and one reason each fits."]]
Rules: only use things you can verify are real. If a detail such as a date is uncertain, say so ("dates to be confirmed, last year was March") rather than inventing it.

# STEP 3: BUILD THE CORE CONTENT
[[Describe the main deliverable, mapped to your method. e.g. "Write the full plan for the best-fit show: before, during and after, using our three method steps."]]
Projected results must be a range grounded in [[your benchmark]], labelled as a projection, never a guarantee.

# STEP 4: THE PAGE (sections in this order)
Every section opens with a short uppercase eyebrow above a bold headline.
1. HERO: "[[Company]]'s [[lead magnet name]]". Subhead: one line personalised to their business. A small line that makes the no-ask clear, e.g. "No pitch. Just the plan we'd run if you were our client."
2. [[SECTION 2 NAME]]: [[what it covers]]
3. [[SECTION 3 NAME]]: [[what it covers]]
4. [[SECTION 4 NAME]]: [[what it covers]]
5. [[KEY NUMBER]]: the projected result in a standout block on a dark background, the number large.
6. PROOF: [[awards, certifications, named clients]], plus "we do this for companies like yours".
7. CALL TO ACTION: a warm, low-pressure invitation to [[your CTA]] with one button to [[booking link]]. Dark section.

# STYLE AND GUARDRAILS
- On-brand with the brand system above, and personalised throughout: their name, what they sell, their buyers. It must feel one-to-one.
- Only use facts about the prospect that you found or that I gave you. Never invent numbers, customers, tools, events or quotes. Estimates are ranges and say how they were worked out.
- [[Your voice rules, e.g. "Marketer-to-marketer. No hype, no fake urgency, no clichés, no exclamation marks."]]
- Never put the prospect's email address on the page.

# STEP 5: BUILD, REVIEW, PUBLISH
- Build the page as one complete, self-contained HTML document: starts with `<!doctype html>`, all CSS inline in a `<style>` tag, only the Google Fonts link as an external asset, images only as https links. No forms or email capture (they are blocked on the host). Responsive at 375px, 768px and 1200px and wider.
- Show me a short summary of what the page says and ask "Publish?"
- When I say yes, call `publish_lead_magnet` with the full HTML, the prospect's company, and their name if known. Give me the link it returns on its own line.
- "Change X and republish": edit the page and publish again with the same slug so the link stays the same.
- "Did they open it?": call `get_lead_magnet_stats` with the slug. "What have I sent?": call `list_lead_magnets`.
Step 2 · 5 minutes · skip if you use ChatGPT
Set up in Claude
Works in claude.ai and the Claude desktop app, on Pro, Max, Team and Enterprise plans.
A. Add the connector
- 01Open Claude and click Customize in the left sidebar.
- 02Open Connectors.
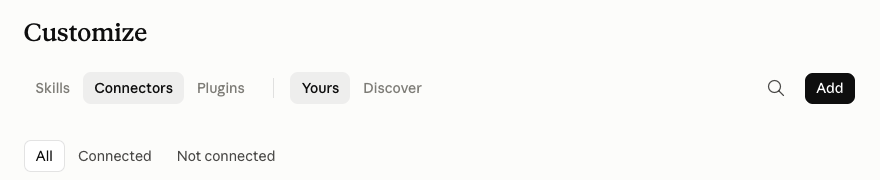
Customize → Connectors - 03Click Add in the top right.
- 04Enter the name
Sendpage, paste your connector URL into MCP server URL, and click Continue.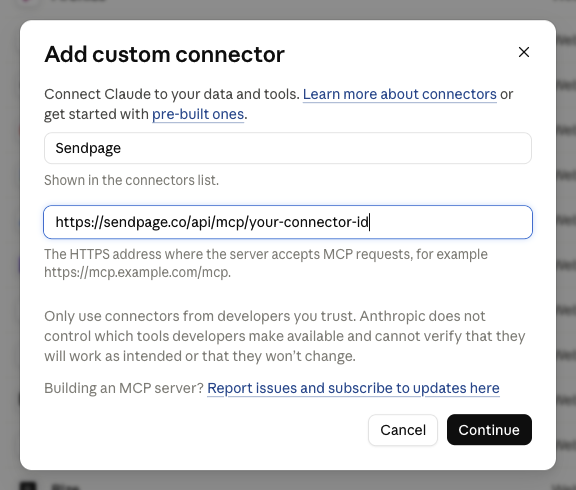
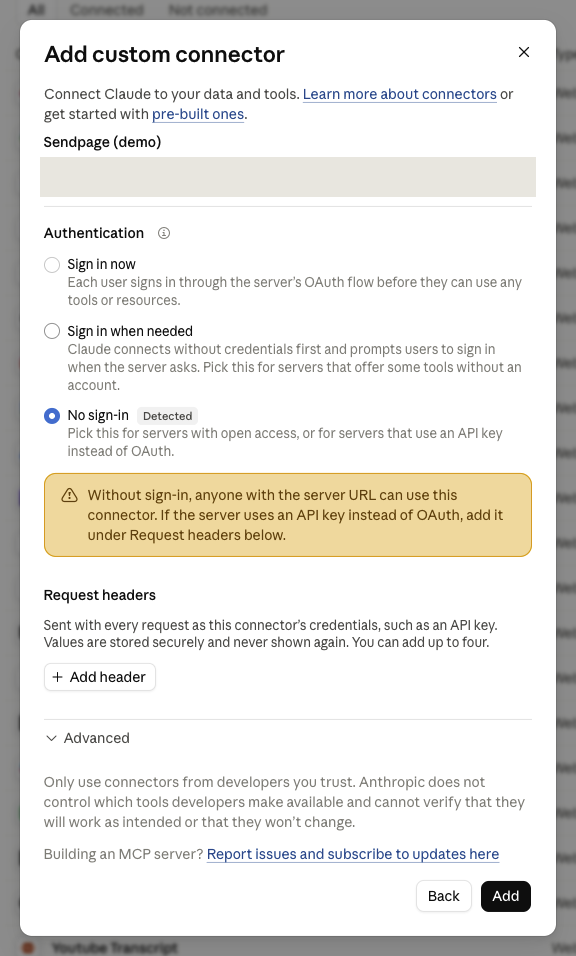
Name it Sendpage and paste your connector URL - 05On Step 2 of 2, under Authentication, choose No sign-in. Claude usually marks it Detected already. Leave everything else as it is and click Add.
Authentication → No sign-in → Add - 06Claude opens the Sendpage connector page and says you’re not connected yet. Click Connect. There is nothing to sign in to, because your URL already identifies your company.
- 07You’ll see Connected to Sendpage and three tools: Publish lead magnet, List lead magnets and Lead magnet stats. They start on Needs approval, so Claude asks before each use. Change them to always allow once you trust the flow.
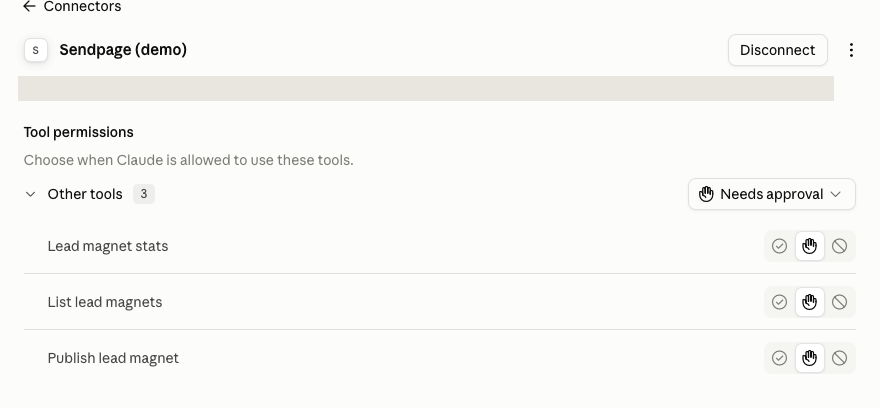
Connected, with the three Sendpage tools
B. Create the project
- 01Click Projects in the left sidebar, then Create project. Under What are you working on? enter
Lead magnets. The second field is optional.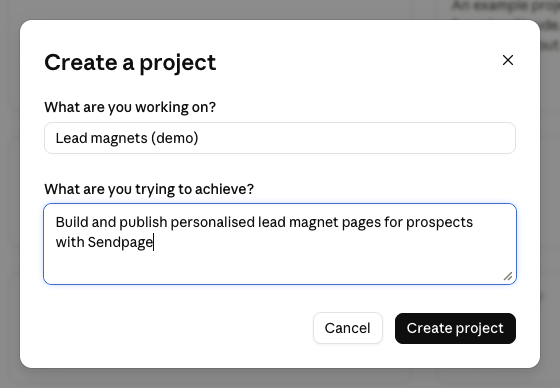
Projects → Create project - 02In the project, find Instructions on the right and click to edit.
- 03Paste your finished prompt from step 1 and save.
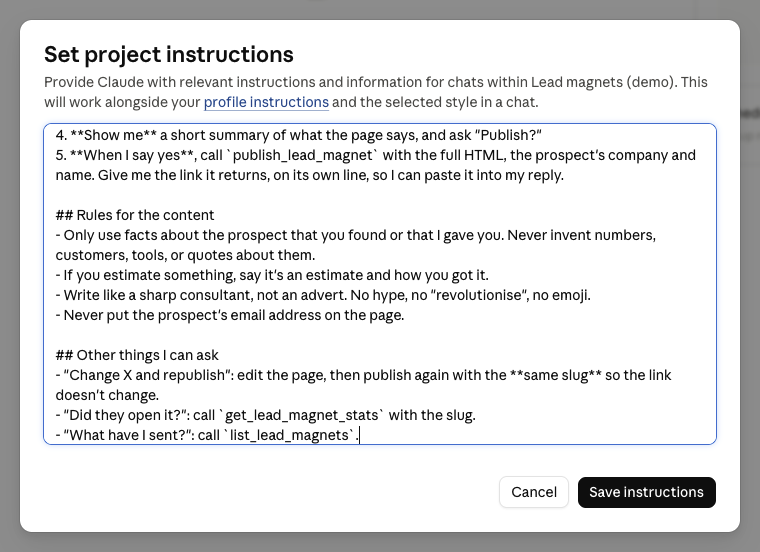
Paste the whole prompt into Instructions
C. Switch it on and test
- 01Start a new chat inside the project. Click the tools button under the message box and make sure Sendpage is switched on.
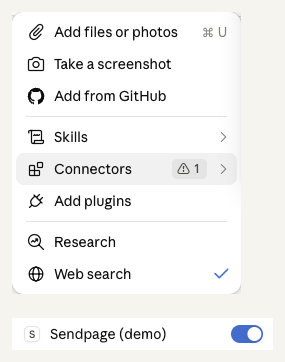
Switch Sendpage on for the chat - 02Type
What have I sent?and press enter. - 03Claude asks permission to use Sendpage. Choose Always allow for a smoother flow, or Allow once to approve each time.
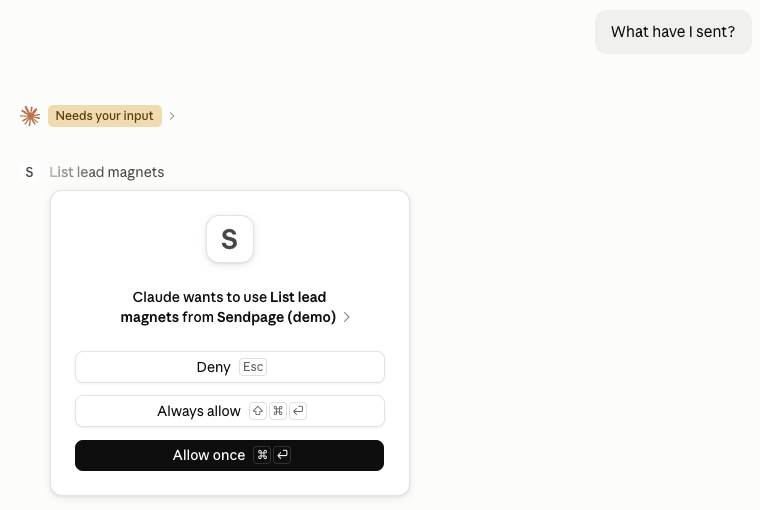
Allow once, or Always allow - 04You should see No lead magnets published yet, or a list of pages if your team has already sent some. Either reply means the connection works. Check the reply says it used Sendpage.
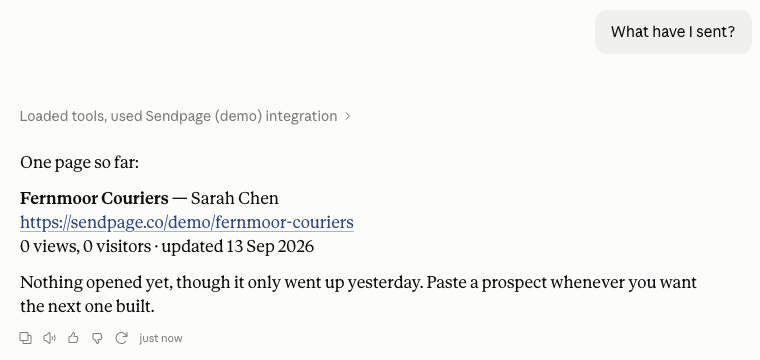
A working connection
Step 3 · 6 minutes · skip if you use Claude
Set up in ChatGPT
ChatGPT runs custom connectors through developer mode, available on Plus, Pro, Business and Enterprise. On Business and Enterprise, an admin may need to allow developer mode for the workspace first.
A. Turn on developer mode
- 01Click your name in the bottom-left corner, then Settings.
- 02Open Security and login and scroll down to Developer mode. You can also reach it from the bottom of the Plugins tab.
- 03Switch Developer mode on. ChatGPT labels it Elevated risk because it allows connectors ChatGPT hasn’t reviewed. That’s expected for Sendpage. Leave Enforce CSP in developer mode as it is.
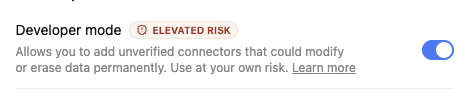
Security and login → Developer mode
B. Create the connector
- 01In Settings → Plugins, click Browse plugins. On the Plugins page, click the Create app button in the top right. It only appears once Developer mode is on.
- 02A New Plugin form opens. Fill it in:
- Name:
Sendpage - Description (optional):
Publishes personalised lead magnet pages - Connection: leave Server URL selected and paste your connector URL
- Authentication:
No Auth
- Name:
- 03Tick I understand and want to continue and click Create. The warning is standard for any connector OpenAI hasn’t reviewed.
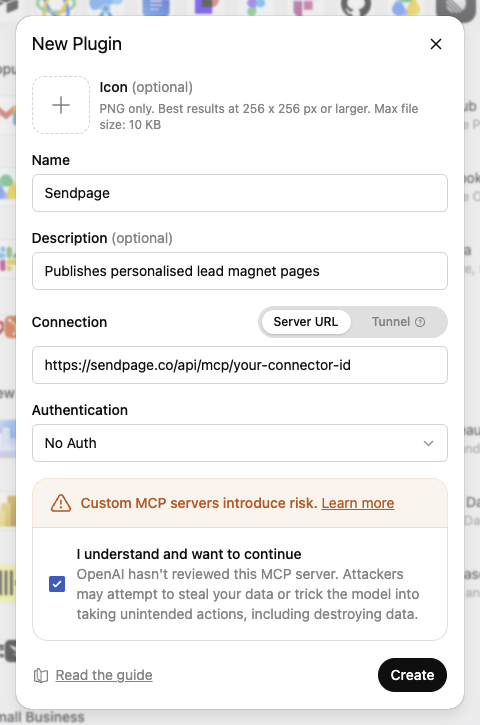
The connector form, filled in - 04ChatGPT opens the Sendpage connector page. Click Connect, then Connect again on Add Sendpage to ChatGPT.
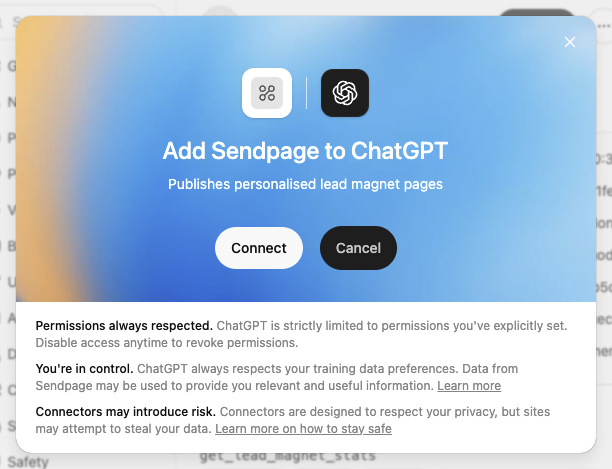
Add Sendpage to ChatGPT → Connect
C. Create the project
- 01In the sidebar, click Projects, then New. Under Project name enter
Lead magnets, leave memory on the default, and click Create project.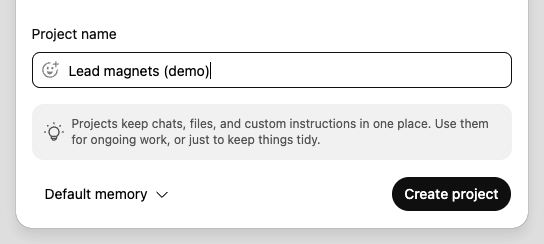
Projects → New → Create project - 02Click the project name at the top of the project page to open Project settings. Paste your prompt into Instructions and click Save at the bottom. Closing with the X throws the text away.
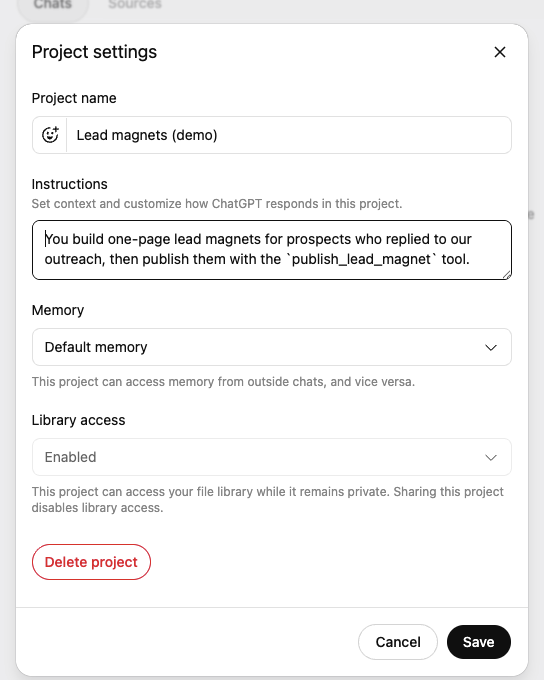
Paste the prompt into the project's Instructions
D. Use it in a chat and test
- 01Start a chat in the project. Click + next to the message box and type
Sendpage. Choose Sendpage under Plugins.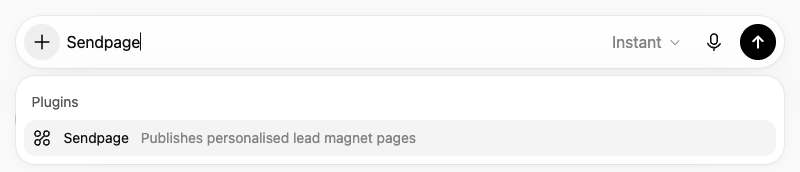
+ → Developer mode → Sendpage - 02Type
What have I sent? - 03Listing pages only reads data, so ChatGPT runs it straight away. When you publish a page later, ChatGPT may ask you to confirm first. Click Confirm when it does.
- 04You should see No lead magnets published yet, or a list of pages your team has already sent. Either means the connection works.
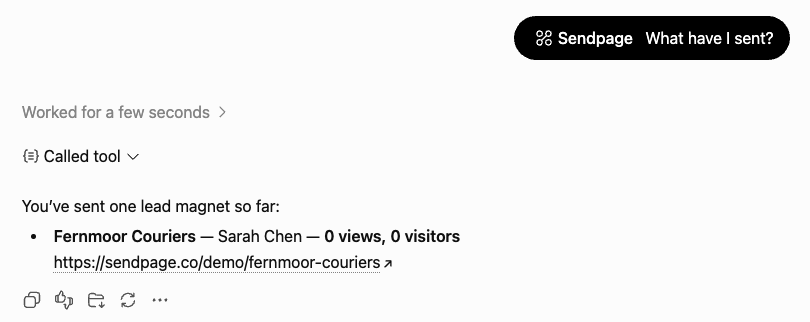
A working connection
Step 4 · 2 to 4 minutes per prospect
Send your first page
A. Paste the prospect
Open a new chat in your project for each prospect. Paste as much of this as you have, in any order:
| Paste | Why it matters |
|---|---|
| Name and job title | The page speaks to their role. The name is used in the link and the stats. |
| Company and website | The main research source. Without a website, pages get thinner. |
| What they said | Their reply, comment or question gives the page its angle. Paste it word for word. |
| Your notes | Anything you know from a call, LinkedIn or a mutual contact. |
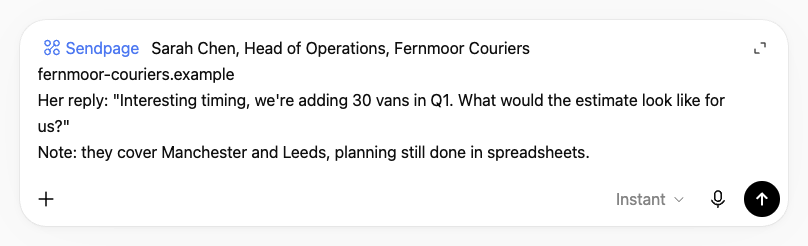
Example message
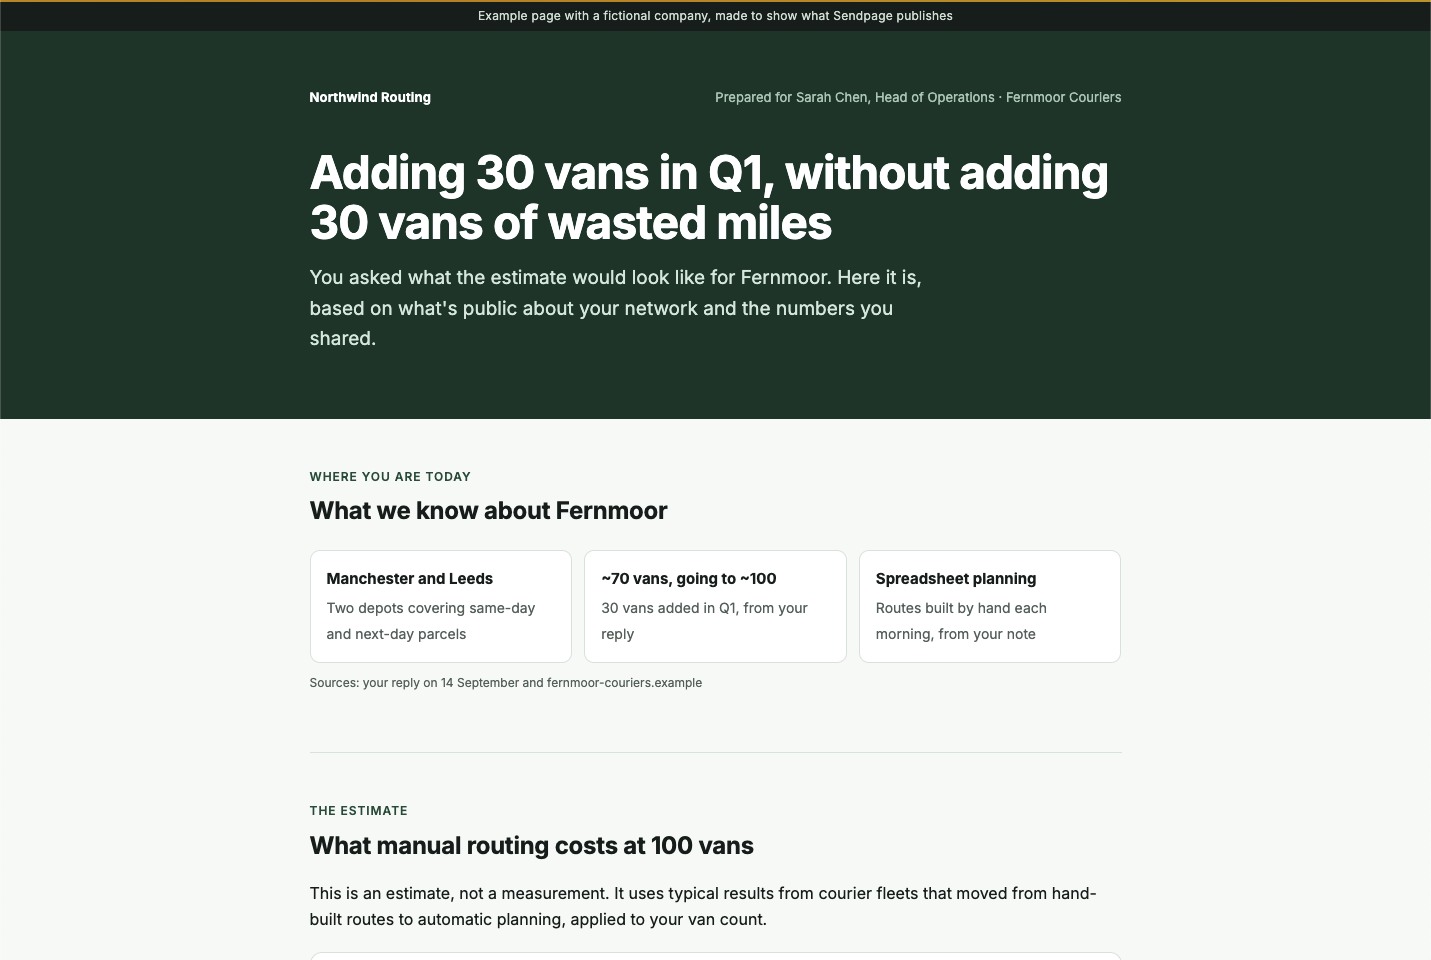
Sarah Chen, Head of Operations, Fernmoor Couriers
fernmoor-couriers.example
Her reply: "Interesting timing, we're adding 30 vans in Q1. What would the estimate look like for us?"
Note: they cover Manchester and Leeds, planning still done in spreadsheets.
B. Review what it found
The AI researches the company and lists the facts it will use with sources. If something important is missing, such as how big their team or fleet is today, it asks you one short question instead of guessing. Answer it, and the AI shows a short summary of the page. Read it before publishing.
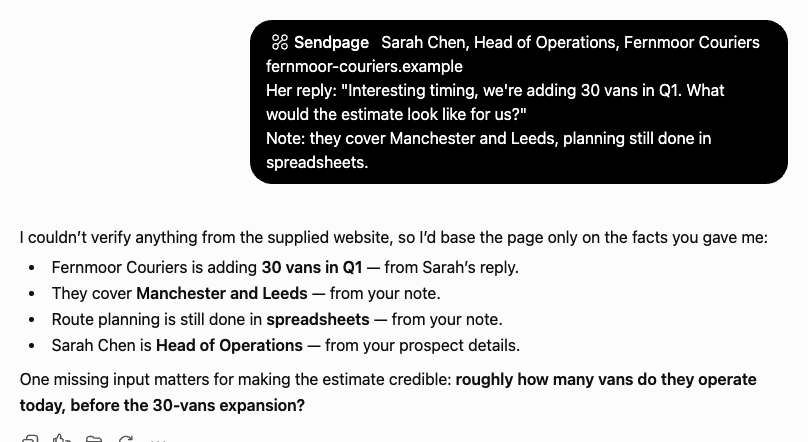
Check that:
- it has the right company, not one with a similar name
- every number about the prospect has a source, or is clearly marked as an estimate
- nothing on it would embarrass you if the prospect forwarded it to their boss
- the button goes to your booking link
If anything is off, say what to change in plain words, for example They're in Leeds, not Liverpool or Make the estimate section shorter.
C. Publish
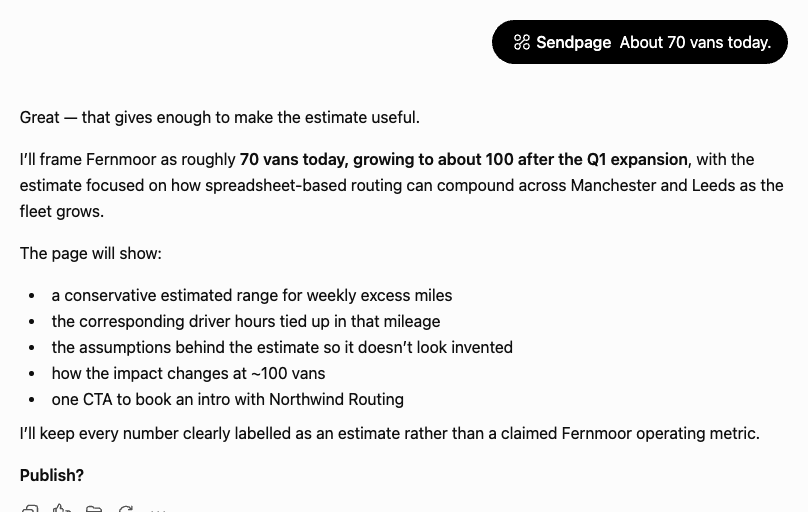
Say publish. The AI sends the page to Sendpage and replies with the link, for example https://sendpage.co/northwind/fernmoor-couriers.
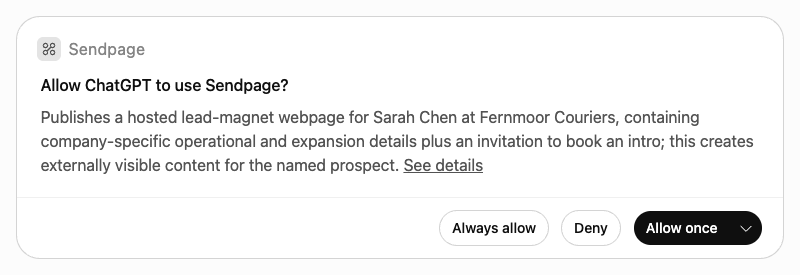
Publishing puts a page on the internet, so the AI asks first. In ChatGPT you’ll see Allow ChatGPT to use Sendpage? Choose Allow once, or Always allow to skip the question next time. Claude shows a similar prompt.

D. Check the page, then send it
- 01Open the link and read the page on your laptop and phone.
- 02Paste the link into your reply, message or ad.
Step 5
Edit and republish
Go back to the chat where you made the page and ask for the change, then say republish. The AI publishes over the same page, so the link stays the same and anyone you already sent it to sees the new version.
| You say | What happens |
|---|---|
Change the headline to focus on the 30 new vans and republish | Updates that page. Same link. |
Make a second version for their CFO | Publishes a new page with its own link, for example …/fernmoor-couriers-2. |
What have I sent? | Lists your recent pages with links and view counts. |
Lost the chat? Ask What have I sent? in any Sendpage chat, copy the page’s slug (the last part of its link), and say Republish the page with slug fernmoor-couriers with these changes…
Step 6
Tracking
Ask Did Sarah open it? or Stats for fernmoor-couriers in any Sendpage chat.
| Signal | What it means |
|---|---|
| Views | Each time the page was opened in a browser. |
| Visitors | Different browsers that opened it. More visitors than you sent to usually means it was forwarded. |
| First and last opened | When they first looked and when they came back. A return visit is a strong moment to follow up. |
| Time on page | Counted in 15-second steps, only while the page is on screen, up to 30 minutes per visitor. |
| Clicks | Links and buttons pressed, including your booking button. |
| Countries | Where the page was read from, based on the visitor’s network. |
Limits
- Some email security tools open links to scan them. They usually don’t run the page, so they rarely count as views.
- Ad blockers and strict privacy browsers can stop tracking. No views doesn’t always mean not read.
- Visitors are counted per browser, so one person on a laptop and a phone shows as two.
Reference
Links and pages
| Link format | sendpage.co/your-company/prospect-company. Your part is set when your account is created. The prospect part comes from their company name. |
| Same company twice | A new page never replaces an old one by accident. The second gets -2, the third -3. |
| Page size | Up to 2 MB. Use image links rather than pasting images into the page. |
| Images and fonts | Any image link and Google Fonts work. Logos are best linked from the prospect’s own website. |
| Forms | Blocked. Pages can’t collect information. Use the booking button instead. |
| Search engines | Pages are hidden from Google and other search engines. Only people with the link can find them. |
| Removing a page | Ask The GTM Company and it is taken down, usually the same day. |
Reference
Security and privacy
- Your connector URL is your key. Don’t paste it in shared documents or public channels. If it leaks, ask for a new one and the old one stops working immediately.
- What Sendpage stores: the pages you publish, the prospect name, company and email you give it, and the tracking events above. It doesn’t store your chats with Claude or ChatGPT.
- Prospect emails are never shown on a page. They’re only used to find the page again.
- Pages are locked down. A page can load images and fonts, but can’t submit forms or send data anywhere except Sendpage’s own tracking.
- You are responsible for what a page says. The prompt tells the AI not to invent facts, but always read a page before sending it.
Reference
Troubleshooting
- The AI says it doesn’t have a Sendpage tool
- Sendpage is switched off for this chat. In Claude, turn it on in the tools menu under the message box. In ChatGPT, click + → Developer mode → Sendpage.
- The AI lists or publishes pages from the wrong account
- You have more than one Sendpage connector switched on, for example an old test one and your real one, and the AI picked the other. Open the menu under the message box, go to Connectors, and leave only one Sendpage connector switched on. Then start a new chat.
- ChatGPT shows old Sendpage actions or warnings
- ChatGPT saves a copy of the connector’s actions when you create it. Open Settings → Plugins, select Sendpage, and click Refresh to load the current version.
- The connector shows an error or “not found” when added
- The URL is incomplete or has been replaced. Copy it again in one piece, with no spaces at the end. If it still fails, ask The GTM Company for your current URL.
- The AI wrote the page but didn’t publish it
- It waits for you to say
publish. If you did and nothing happened, check the tool is switched on and saypublish it now using Sendpage. - “The page is over 2 MB”
- The AI embedded images in the page. Say
use image links instead of embedded images and publish again. - “That is not a full HTML document”
- The AI sent only part of the page. Say
send the complete HTML document and publish again. - The page looks broken on a phone
- Say
make the page work well on a phone screen and republish. The link stays the same. - The AI got a fact about the prospect wrong
- Tell it the correct fact and republish. If it keeps guessing, paste the fact from their website yourself.
- Stats show no views but the prospect says they read it
- Their browser or company network blocked tracking. See the limits under Tracking.
- Something else
- Book a call with The GTM Company and bring the link to the page.